Stone veneer for home exterior offers a captivating blend of natural beauty and modern design. This durable and versatile material transforms the look of any home, adding curb appeal and lasting value. From the initial design choices to the final installation, understanding the process ensures a successful and aesthetically pleasing outcome. This guide explores everything you need to know, from selecting the right stone to maintaining its stunning appearance for years to come.
We’ll delve into the various types of stone veneer available, highlighting their unique properties and cost considerations. We’ll also cover the step-by-step installation process, crucial design elements, and essential maintenance tips to keep your home’s exterior looking its best. Whether you’re a seasoned DIY enthusiast or relying on professional help, this comprehensive guide will empower you to make informed decisions.
What is Stone Veneer?
Source: fusionstone.ca
Stone veneer is a thin layer of natural or manufactured stone that’s affixed to a surface, typically as an exterior cladding for homes. Unlike solid stone, which is considerably thicker and heavier, veneer offers a similar aesthetic appeal with significantly reduced weight and installation costs. It’s a popular choice for homeowners seeking the beauty and durability of natural stone without the substantial expense and structural implications.
Stone Veneer Manufacturing
The manufacturing process for stone veneer varies depending on the type of stone and the desired finish. Natural stone veneer typically begins with quarrying large blocks of stone. These blocks are then cut into thinner slabs using wire saws or other specialized equipment. The slabs are further processed into smaller, more manageable pieces, often with a variety of textures and shapes created through splitting, chipping, or sawing.
These pieces are then cleaned and may undergo additional treatments to enhance their color or durability before being packaged and distributed. Manufactured stone veneer undergoes a similar process, but instead of quarrying natural stone, manufacturers use a combination of cement, aggregates, and color pigments to create stone-like pieces that are molded and cured. This allows for a wider range of colors and textures, often at a lower cost than natural stone.
Types of Stone Used in Veneer
A wide variety of stones are used in veneer applications. Each offers unique characteristics in terms of appearance, durability, and cost.Granite veneer is known for its exceptional hardness and durability, offering excellent resistance to weathering and staining. Its wide range of colors and patterns makes it a versatile choice for many architectural styles. Slate veneer, on the other hand, is characterized by its natural cleavage, resulting in a distinctive layered appearance.
Slate is relatively durable and weather-resistant, but it can be more prone to chipping than granite. Limestone veneer is softer than granite or slate, offering a more subtle and often warmer appearance. It’s generally less expensive but may require more maintenance over time. Other options include sandstone, travertine, and quartzite, each with its own distinct properties and aesthetic qualities.
Advantages and Disadvantages of Stone Veneer
Stone veneer offers several advantages over other exterior cladding materials. Its natural beauty enhances curb appeal, increasing property value. It’s relatively durable and weather-resistant, providing long-term protection for the home’s exterior. The diverse range of colors, textures, and styles allows for considerable design flexibility. However, stone veneer can be more expensive than alternatives like vinyl or fiber cement siding.
Installation can be more complex and time-consuming, requiring skilled labor. Maintenance may also be necessary to address minor chipping or staining over time, depending on the type of stone and the climate.
Cost, Durability, and Maintenance Comparison of Stone Veneer Types
| Stone Type | Cost (Relative) | Durability | Maintenance |
|---|---|---|---|
| Granite | High | Very High | Low |
| Slate | Medium-High | High | Medium |
| Limestone | Medium | Medium | Medium-High |
| Manufactured Stone | Low-Medium | Medium | Low |
Installation Process of Stone Veneer
Installing stone veneer on your home’s exterior can significantly enhance its curb appeal and value. However, it’s a project that requires careful planning and execution to ensure a long-lasting, aesthetically pleasing result. This guide Artikels the process, from preparation to completion.
Necessary Tools and Materials
Proper tools and materials are crucial for a successful installation. Using the right equipment will not only make the job easier but also contribute to a higher-quality finish. Insufficient tools can lead to delays and potentially damage the veneer.
- Measuring tape and level: Accurate measurements are fundamental for a neat and even installation.
- Masonry saw or grinder with diamond blade: Needed for cutting stone veneer to fit around corners and openings.
- Mortar mixing tools: A bucket, trowel, and possibly a mixer for larger projects.
- Safety glasses and gloves: Essential for protecting yourself from dust, debris, and potential injuries.
- Stone veneer: Choose a type and color that complements your home’s style.
- Mortar: Select a type appropriate for exterior use and the type of stone veneer being installed.
- Metal lath (if needed): Provides a strong base for the veneer on some substrates.
- Backer board (if needed): A cement board that provides a solid, even surface for the veneer.
- Weep holes (if needed): Allow moisture to escape from behind the veneer, preventing damage.
Substrate Preparation
Before any stone is laid, the surface must be thoroughly prepared. This crucial step prevents problems down the line and ensures the veneer adheres properly. A poorly prepared surface can lead to cracking, shifting, and premature failure of the veneer.
The substrate should be clean, dry, and structurally sound. Any loose or damaged areas must be repaired. This might involve patching cracks, removing loose mortar, or applying a waterproof membrane depending on the existing surface. For instance, if installing over old siding, ensuring it’s securely attached and free from rot is essential. If installing directly onto brick, cleaning loose mortar and ensuring a sound surface is key.
Finally, a primer might be applied to enhance adhesion depending on the substrate.
Step-by-Step Installation Guide
The installation process itself is methodical and requires attention to detail at each stage. Following these steps will lead to a professional-looking result.
- Layout: Plan the stone arrangement, considering patterns and cuts needed. Dry-fitting (laying the stones without mortar) can help visualize the final look and identify any issues early.
- Mortar Application: Apply a thin layer of mortar to the back of the stone and the substrate. Avoid using excessive mortar, which can lead to bulging and cracking.
- Stone Placement: Carefully position the stone according to your layout, pressing firmly to ensure good contact with the mortar.
- Grouting: Once the mortar has set slightly, fill the gaps between stones with grout. Use a grout float to ensure even distribution and remove excess grout.
- Cleaning: After the grout has set, clean the surface of the veneer using a soft brush or sponge. Remove any excess mortar or grout to maintain a clean finish.
- Sealing (Optional): A sealant can protect the stone veneer from water damage and enhance its longevity. Apply according to the manufacturer’s instructions.
Installation Checklist
A checklist ensures no steps are missed and contributes to a successful installation. This comprehensive approach minimizes the risk of errors and ensures a quality finish.
- Obtain necessary permits.
- Prepare the substrate thoroughly.
- Gather all tools and materials.
- Dry-fit the stones before applying mortar.
- Apply mortar evenly and consistently.
- Ensure proper stone placement and alignment.
- Fill gaps with grout and clean excess material.
- Allow sufficient drying time before sealing (if applicable).
- Inspect the completed work for any imperfections.
Design Considerations for Stone Veneer
Choosing the right stone veneer for your home’s exterior is a crucial design decision that significantly impacts its overall aesthetic appeal and curb appeal. The careful selection of stone type, color, and installation pattern can transform a house into a stunning architectural statement, while poor choices can detract from its beauty. This section explores key design considerations to help you make informed decisions.
Design Styles and Stone Veneer Applications
Stone veneer offers remarkable versatility, complementing a wide range of architectural styles. A rustic farmhouse might benefit from the warm tones and rough texture of a fieldstone veneer, creating a sense of timeless charm. Conversely, a modern minimalist home could be beautifully accented with sleek, uniformly cut stone panels in neutral colors, emphasizing clean lines and contemporary sophistication.
Traditional homes often pair well with the classic elegance of stacked stone veneer, mimicking the look of meticulously laid masonry. Mediterranean-style homes can be enhanced with lighter-colored, textured stones reminiscent of sun-drenched landscapes. The key is to choose a veneer that harmonizes with the existing architectural details and creates a cohesive design.
Color and Texture Selection for Stone Veneer
The color and texture of the stone veneer should complement the home’s existing architectural features and the surrounding landscape. For instance, a home with a dark roof and dark trim might look stunning with a medium-toned stone veneer, offering a pleasing contrast without being jarring. Conversely, a light-colored home might benefit from a lighter stone veneer to maintain a harmonious look.
The texture also plays a vital role; rough-hewn stone adds rustic charm, while smooth, polished stone projects a more refined and modern feel. Consider the surrounding environment; a home nestled in a wooded area might look better with earth tones, while a coastal home might benefit from lighter, brighter shades. Choosing samples and viewing them in natural light against your home’s exterior is highly recommended.
Common Design Mistakes to Avoid
One common mistake is using stone veneer inconsistently or inappropriately. Avoid using it sparingly as an afterthought; a small patch of stone veneer on a large expanse of siding can look unbalanced and visually unappealing. Another mistake is choosing a stone veneer that clashes with the home’s overall style or color palette. Using overly contrasting colors or textures can create a disjointed and visually unpleasant look.
Finally, improper installation can significantly detract from the aesthetic appeal. Uneven joints, gaps, or poorly matched pieces can ruin the look of even the most beautiful stone veneer. Careful planning and professional installation are crucial for achieving a polished, high-quality finish.
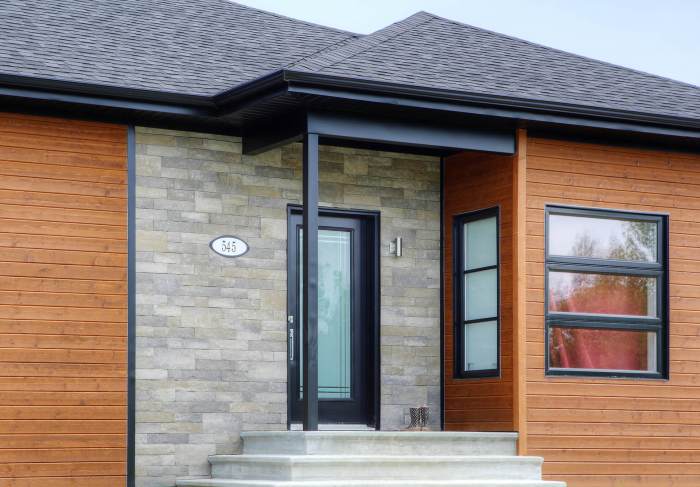
Example of a Home Exterior with Stone Veneer
Imagine a two-story craftsman-style home with a gable roof. The lower level features a stacked stone veneer in a warm, earthy brown tone, extending up to the first-floor window sills. The texture is slightly rough, providing visual interest without being overly rustic. The upper level is clad in a light-colored, smooth stucco that contrasts beautifully with the darker stone below.
The stone veneer is carefully integrated around the windows and doorways, creating a seamless and sophisticated look. A gently sloping front porch, also featuring the same brown stone veneer, completes the design, providing a welcoming and visually appealing entryway. The overall effect is a harmonious blend of textures and colors, creating a home exterior that is both visually striking and inviting.
The landscaping, featuring native plants and shrubs, further complements the natural tones of the stone veneer, creating a cohesive and aesthetically pleasing whole.
Maintenance and Care of Stone Veneer
Stone veneer, while durable, requires regular maintenance to preserve its beauty and longevity. Neglecting care can lead to premature deterioration and costly repairs. A proactive approach to cleaning and sealing, combined with addressing potential problems promptly, will ensure your stone veneer remains a stunning feature of your home for years to come.
Routine Maintenance
Regular inspection is key to preventing minor issues from becoming major problems. Ideally, you should visually inspect your stone veneer at least twice a year, in spring and autumn. Look for loose stones, cracks, efflorescence (a white, powdery deposit), or any signs of staining or discoloration. Addressing these issues early can prevent more extensive damage and costly repairs.
Simple tasks like removing debris with a soft brush and rinsing away loose dirt with a hose can go a long way in maintaining the appearance of your stone veneer.
Cleaning Stone Veneer, Stone veneer for home exterior
Cleaning methods depend on the type of stone and the nature of the soiling. For general cleaning, a solution of mild detergent and water, applied with a soft-bristled brush, is usually sufficient. Rinse thoroughly with clean water to remove all traces of soap. For tougher stains, a pressure washer can be effective, but use caution to avoid damaging the mortar or the stone itself.
Maintain a safe distance and use a low-pressure setting. Always test any cleaning solution on an inconspicuous area first to ensure it doesn’t damage or discolor the stone. Avoid harsh chemicals or abrasive cleaners, as these can etch or scratch the surface of the stone.
Sealing Stone Veneer
Sealing your stone veneer protects it from water damage, staining, and weathering. The frequency of sealing depends on the type of stone and the climate. Some stones are naturally more porous than others and may require more frequent sealing. A professional can assess your specific needs and recommend the appropriate sealant. Application typically involves applying the sealant evenly to a clean, dry surface using a brush or roller.
Follow the manufacturer’s instructions carefully for best results. Proper sealing can significantly extend the lifespan of your stone veneer.
Common Problems and Solutions
Several issues can affect stone veneer over time. Efflorescence, mentioned earlier, is a common problem caused by water-soluble salts migrating to the surface. Gentle brushing and rinsing usually resolves this. Loose or damaged stones should be repaired or replaced by a professional. Cracks in the mortar can allow water penetration, leading to further damage.
These should be repaired promptly with a suitable mortar mix. Moss or algae growth can be treated with a specialized cleaner designed for exterior surfaces. Always follow the manufacturer’s instructions and take appropriate safety precautions when using cleaning products.
Regular Maintenance Schedule
A simple maintenance schedule can help you keep your stone veneer looking its best.
| Task | Frequency |
|---|---|
| Visual Inspection | Twice yearly (Spring & Autumn) |
| Cleaning (mild detergent & water) | As needed, but at least once a year |
| Pressure washing (if necessary) | Every 2-3 years |
| Sealing | Every 3-5 years (or as recommended by a professional) |
| Repair of loose stones or mortar | As needed |
Environmental Impact and Sustainability
Stone veneer, while offering a beautiful and durable exterior cladding option, has environmental implications that deserve careful consideration. Its production and installation process, like any building material, consumes resources and generates waste. Understanding these impacts allows for informed decisions about its use in construction projects and explores ways to minimize its environmental footprint.The environmental impact of stone veneer is multifaceted, encompassing the extraction, processing, transportation, and installation stages.
Quarrying natural stone, for example, can lead to habitat disruption and soil erosion. Manufacturing processes often involve energy consumption and the release of pollutants. Transportation, from quarry to manufacturing facility to construction site, contributes to greenhouse gas emissions. Finally, the disposal of excess or damaged veneer at the end of a building’s life cycle presents another environmental challenge.
Stone Veneer Production and Installation Impacts
The extraction and processing of natural stone for veneer involves significant energy consumption and can lead to habitat destruction and water pollution. Quarrying operations often require heavy machinery, resulting in greenhouse gas emissions and dust pollution. The transportation of raw materials and finished products adds to the carbon footprint. Installation itself also requires energy and resources, including adhesives, mortars, and potentially scaffolding.
The overall environmental impact depends heavily on the type of stone, its origin, and the efficiency of the production and transportation processes. For instance, locally sourced stone generally has a lower carbon footprint compared to stone transported across continents.
Sustainability Compared to Other Cladding Options
Compared to other exterior cladding materials, stone veneer’s sustainability profile is complex. While it is a durable material with a long lifespan, potentially reducing the need for frequent replacements, the energy intensity of its production and transportation can be high. Alternatives like wood siding (depending on sourcing and treatment) or fiber cement can have lower embodied carbon footprints in some cases, particularly if sourced sustainably and manufactured locally.
However, the longevity and resilience of stone veneer often outweigh the initial environmental cost over the material’s entire life cycle. A life-cycle assessment, considering all stages from extraction to disposal, is crucial for a fair comparison.
Recycled and Reclaimed Materials in Stone Veneer Production
The use of recycled or reclaimed materials in stone veneer production is relatively limited compared to other building materials. While some manufacturers might incorporate recycled aggregates in the manufacturing process of certain types of veneer, the majority of stone veneer is still produced from newly quarried stone. However, the use of reclaimed stone from demolished buildings or other sources is increasing, offering a more sustainable alternative.
Reclaimed stone reduces the demand for new quarrying, conserving natural resources and minimizing habitat disruption. The aesthetic appeal of reclaimed stone, with its unique character and history, also adds to its desirability.
Pros and Cons of Stone Veneer’s Environmental Impact
Let’s summarize the environmental impact of stone veneer with a bulleted list of pros and cons:
- Pros:
- Long lifespan, reducing the need for frequent replacements.
- Potential for using reclaimed stone, minimizing resource depletion.
- Durability reduces the need for maintenance and repairs.
- Cons:
- High energy consumption in quarrying and processing.
- Potential for habitat disruption and water pollution during quarrying.
- Significant transportation emissions, especially for long-distance sourcing.
- Limited use of recycled materials in current production methods.
Cost Considerations: Stone Veneer For Home Exterior
Stone veneer offers a beautiful and durable exterior cladding option, but its cost is a significant factor to consider before embarking on a renovation or new construction project. The final price tag depends on a variety of interconnected elements, ranging from the type of stone chosen to the complexity of the installation. Understanding these cost drivers allows for better budgeting and informed decision-making.The overall cost of stone veneer installation is influenced by several key factors.
These include the type of stone selected (natural or manufactured), the quantity needed, the complexity of the project (including the size and shape of the house and the presence of intricate architectural details), the location of the project (affecting labor costs and material transportation), and the chosen installer’s experience and rates. Higher-end stones like genuine granite or slate will naturally be more expensive than manufactured alternatives or less-desirable natural stones.
Projects requiring extensive cutting and fitting of the veneer around complex architectural features will also increase the overall cost.
Factors Influencing Stone Veneer Cost
Several interconnected elements contribute to the total cost. The type of stone, its quantity, and the complexity of the installation all play a crucial role. For instance, a large, multi-story home will naturally require more stone veneer and more labor hours than a smaller bungalow. Similarly, a design incorporating intricate architectural details will necessitate more precise cutting and fitting, adding to the labor costs.
The geographical location also matters, as labor rates and material transportation costs can vary significantly between regions. The experience and reputation of the installer will also influence the final cost, with more experienced and reputable installers typically charging higher rates.
Cost Comparison with Other Cladding Materials
Stone veneer typically falls within a mid-to-high range in terms of cost compared to other exterior cladding materials. Vinyl siding, for example, is generally the most affordable option, offering a low initial investment. Brick, while offering excellent durability, often surpasses stone veneer in cost. Fiber cement siding provides a balance between cost and durability, usually falling somewhere between vinyl and stone veneer.
The precise cost comparison will depend on the specific materials, quality, and labor costs in a given region. For example, in a region with abundant locally sourced stone, the cost of stone veneer might be more competitive with fiber cement siding.
Cost Breakdown: Materials, Labor, and Permits
The total cost of a stone veneer project can be broken down into three main components: materials, labor, and permits. Materials costs encompass the purchase of the stone veneer itself, along with any necessary adhesives, sealants, and other supplementary materials. Labor costs represent the wages paid to the installers for their time and expertise. Permitting fees vary depending on local regulations and the scope of the project.
In a hypothetical project, a typical breakdown might be 40% for materials, 50% for labor, and 10% for permits. However, this can fluctuate significantly based on the specific project details.
Estimated Cost Range for Stone Veneer
The following table provides an estimated cost range for different types and amounts of stone veneer. These figures are approximate and should be considered as a general guideline only. Actual costs can vary considerably based on the factors discussed above.
| Stone Type | Amount (sq ft) | Material Cost Range ($) | Labor Cost Range ($) |
|---|---|---|---|
| Manufactured Stone | 500 | 2,500 – 5,000 | 3,000 – 6,000 |
| Natural Stone (e.g., Limestone) | 500 | 5,000 – 10,000 | 4,000 – 8,000 |
| High-End Natural Stone (e.g., Granite) | 500 | 10,000 – 20,000+ | 5,000 – 10,000+ |
| Manufactured Stone | 1000 | 5,000 – 10,000 | 6,000 – 12,000 |
Ending Remarks
Ultimately, choosing stone veneer for your home exterior is an investment in both aesthetics and longevity. By carefully considering the factors discussed – from material selection and installation techniques to ongoing maintenance – you can achieve a stunning and enduring result. Remember to weigh the pros and cons of different stone types, plan your design carefully, and prioritize proper installation for a beautiful and long-lasting transformation of your home’s exterior.
The effort will be rewarded with a property that stands out for its unique charm and lasting appeal.
Essential FAQs
Is stone veneer suitable for all climates?
While generally durable, certain stone types are better suited to specific climates. For example, porous stones might fare less well in extremely wet or freezing conditions. Consult with a professional to choose a veneer appropriate for your local climate.
How long does stone veneer installation typically take?
The installation time varies greatly depending on the size of the project, the complexity of the design, and the experience of the installers. Expect the process to take several days to several weeks for larger homes.
Can I install stone veneer myself?
While possible for smaller projects with simple designs, professional installation is often recommended. Improper installation can lead to damage and costly repairs. Assess your DIY skills realistically before attempting it yourself.
How often should I seal my stone veneer?
The frequency of sealing depends on the type of stone and your climate. However, a general guideline is to reseal every 3-5 years, or as needed if you notice signs of weathering or staining.
What’s the warranty on stone veneer?
Warranties vary depending on the manufacturer and type of stone. Always check the manufacturer’s specifications for details on coverage and duration.


